


မိမိ ကိုယ္ပိုင္ ဘေလာ့ဆိုဒ္ ေတြမွာ add a badge to your site ေလးထည့္ထားခ်င္ရင္

မိတ္ေဆြမ်ား ကိုယ္ပိုင္ ဘေလာ့ဆိုဒ္ ေတြမွာfacebook add a badge to your site ေလးထည့္ထားခ်င္တဲ့မိတ္ေဆြမ်ားအတြက္ပါ အသံုးျပဳ နည္းကိုေအာက္မွာ ပံုနဲ ့တကြ တင္ေပးထားပါတယ္


ေကာ္ပီ ျပီးရင္ ယူလာတဲ့ ကုဒ္ကို မိမိ ဆိုဒ္က HTML မွာထည့္ေပးပါ blogspot ဆိုရင္ HTML/JAVA မွာထည့္ေပးပါ


Chat Box(Google chat Box) in Blogger and Stay Connected with your Blog readers

Add Google Talk Chat Box in Blogger and Stay Connected with your Blog people. They'll be able to chat with you whenever you're signed in to Google Talk as yourgmailid@gmail.com.
This is best feature of your blog for best user experience.
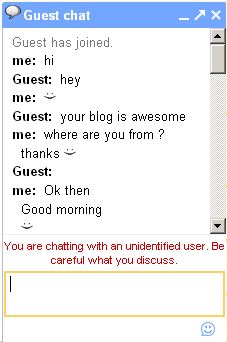
A Google Talk chatback badge allows others to chat with you even if they haven't signed up for Google Talk on their Google Account or if they don't have a Google Account. You can put the badge in your blog or website, and people who visit those pages can chat with you. The badge will display your online status (whether you're available to chat or not) and, optionally, your status message.
To use this badge, copy and paste the HTML code below into your web page. If the site that hosts your web page does not support direct HTML editing or embedded frames then click 'Edit' to select a style of badge that does not use frames. If you want to include your badge in an email message, you should use the 'Hyperlink only' or 'Url only' styles.
This are the some steps to follow :
Step 1. Go to http://www.google.com/talk/service/badge/New and fill the necessary detail as described above, like Nick name, Badge style and Title of the badge.
Press standard Mode or some other options available
Step 2. Log in to your Blogger Dashboard and Navigate to Design> Page Element.

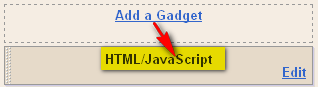
Step 3. Add a Gadget as HTML/JavaScript and Paste the Code we have copied in step 2.
Step 4. Save your Template and Done!. Now Whenever your blog reader will open chat session you will have the chat box pop up visible in your Gmail in-box page (refer below sample screen shot).

Read More ကို ပံုေလးနဲ ့လုပ္ခ်င္ရင္

Read More ကို ပံုေလးနဲ ့လုပ္ခ်င္သူမ်ားအတြက္ အေနာ္သိထားတဲ့ နည္းကိုေ၀မွ်ေပးလိုက္ပါတယ္ ။
1. သင့္ blogger account ကို Log in
2. Go to Design>>>Edit HTML
3. "Expand Widget Templates" အမွန္ုျခစ္ေပး
4. Read More ဆိုတဲ့စာသားကိုေတြ ့ေအာင္ရွာ (ျမန္မာလိုဆက္ဖတ္ရန္လုပ္ထားရင္ေတာ့ သိေတာ့ဘူး)
5. Read More ေနရာမွာRead More ကိုဖ်က္ျပီးေအာက္ကကုဒ္ေလးကိုအစားထိုးေပးပါ
6. အနီေရာင္စာလံုးနဲ ့ ICON URL ဆိုတဲ့ေနရာမွာ Read More ပံုလင့္ကိုထည့္ေပးပါ
ဥပမာ

ဒီလိုေပါ့
7. Save လုပ္ပါ ။
read more icon / button အနည္းငယ္ေ၀မွ်ေပးလိုက္ပါတယ္ ။


No comments:
Post a Comment
romarakhaing blog လာေရာက္ႀကေသာသူငယ္ခ်င္းမ်ားကုိလူိက္စြာႀကဳိပါ၏။